L7: Review Project
Excuse our mess while we finish this page! You can contribute here.
Overview
In this lesson, students will combine everything they have learned so far to build an interactive hearing test device.
The program will:
- play tones through the buzzer
- increase the sound frequency step-by-step
- allow the user to stop the test using a button press
- display the final frequency
Students will use:
- variables
- loops
- conditions
- button events
- timing
- sound generation
to create a complete interactive project.
Learning Goals
Students will:
- combine multiple programming concepts
- control sound frequencies
- use variables to track values
- use loops to sweep frequencies
- stop a loop using a condition
- display results on the screen
- build a complete interactive device
Time Required
45–60 minutes
Materials
- CincoBit or PixoBit
- USB cable
- Computer or Chromebook
- MicroBlocks
Teacher Notes
This lesson is designed as a project lesson that combines concepts from previous lessons into one complete application.
Students will apply:
- events
- variables
- conditions
- loops
- timing
- sound
in a real interactive system.
This lesson also introduces the idea that:
computers can generate signals at different frequencies.
What is Frequency?
Frequency describes how fast a sound wave vibrates.
Frequency is measured in:
- Hertz (Hz)
Examples:
| Frequency | Sound |
|---|---|
| 100 Hz | Low pitch |
| 1000 Hz | Medium pitch |
| 5000 Hz | High pitch |
Higher frequencies sound higher in pitch.
Human Hearing
Humans can hear many different frequencies, but hearing ability changes with:
- age
- environment
- volume
- hearing health
This project explores:
How high of a sound can you hear?
Project Goal
The hearing test will:
- start at a lower frequency
- slowly increase the pitch
- continue playing sounds in a loop
- stop when the user presses a button
- display the highest heard frequency
Step 1 — Start the Test
Create a variable called frequency and then use a when button pressed to set the frequency to zero and enter a forever loop.
Inside the loop, we will change (increase) frequency variable by 200, to then start tone with that frequency.
The loop will continue increasing the frequency forever but we need to slow it down a bit by adding a wait.
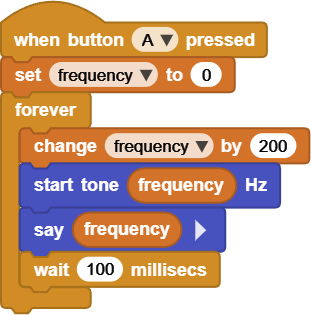
The say block is very helpful as it shows what frequency is being generated. As the variable increases:
| Frequency | Result |
|---|---|
| 500 Hz | Low tone |
| 1000 Hz | Higher tone |
| 3000 Hz | Very high tone |
| 8000 Hz | Extremely high tone |
Students will hear the pitch rise over time.
The forever loop has no way to stop. This will cause the program to run forever, increasing the frequency as it goes! You will need to use the stop button on the top right corner of MicroBlocks.
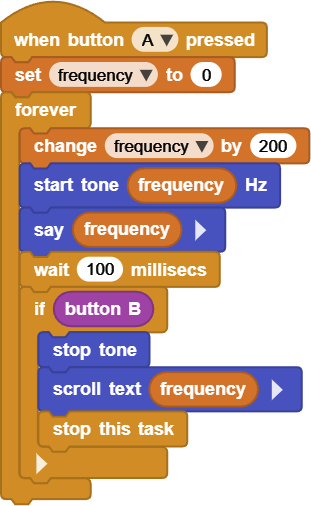
Step 2 — Stop the Test
The easiest way to stop the test is by checking if button B was pressed. This polling is done inside the forever loop, no event block will be used.
if button B is pressed, stop tone and scroll text showing the frequency.
Concepts Used in This Project
| Concept | How It Is Used |
|---|---|
| Variables | Store frequency and stop state |
| Loops | Repeat frequency sweep |
| Conditions | Use Polling to stop a loop when button changes |
| Events | Detect button presses |
| Wait | Control timing |
| Sound | Generate tones |
Understanding Program Flow
The program follows this sequence:
- Start test
- Play sound
- Increase frequency
- Repeat loop
- Wait for button press
- Stop loop
- Display result
This is an example of a complete interactive algorithm.
Try It
Can you:
- increase frequency faster
- slow the sweep down
- add display animations
- add a countdown before starting
Real-World Connection
Frequency testing is used in:
- hearing exams
- music production
- speaker testing
- communication systems
- audio equipment
Electronics and computers often generate precise frequencies for testing and measurement.
Troubleshooting
- No sound
- verify buzzer blocks are connected properly
- check frequency values
- Frequency changes too quickly
- increase wait time
- Test never stops
- verify the stop condition is correct
- Display does not show the result
- ensure display code runs after the loop ends
Vocabulary
| Word | Meaning |
|---|---|
| Frequency | How fast a sound vibrates |
| Hertz (Hz) | Unit used to measure frequency |
| Sweep | Gradually changing a value |
| Loop | Repeating instructions |
| Variable | Stores changing information |
Wrap-Up Question
Why do loops and variables work well together in projects like this?