Get Started
Every DUELink module has its own set of text commands — see each module's page in the Product Catalog for the full list.
One command lives on every module: StatLed(on, off, count) blinks the on-board STAT LED. The three numbers are on-time, off-time, and count — StatLed(200, 200, 5) means on for 200ms, off for 200ms, repeated 5 times.

These commands assume your module is running the standard DUELink firmware. If you're working with MicroBlocks (often the case for classroom boards), head over to the MicroBlocks guide instead.
Try a command in your browser (optional)
This step is optional — you can skip straight to writing code below — but it's a great way to see a module respond before any install or project setup.
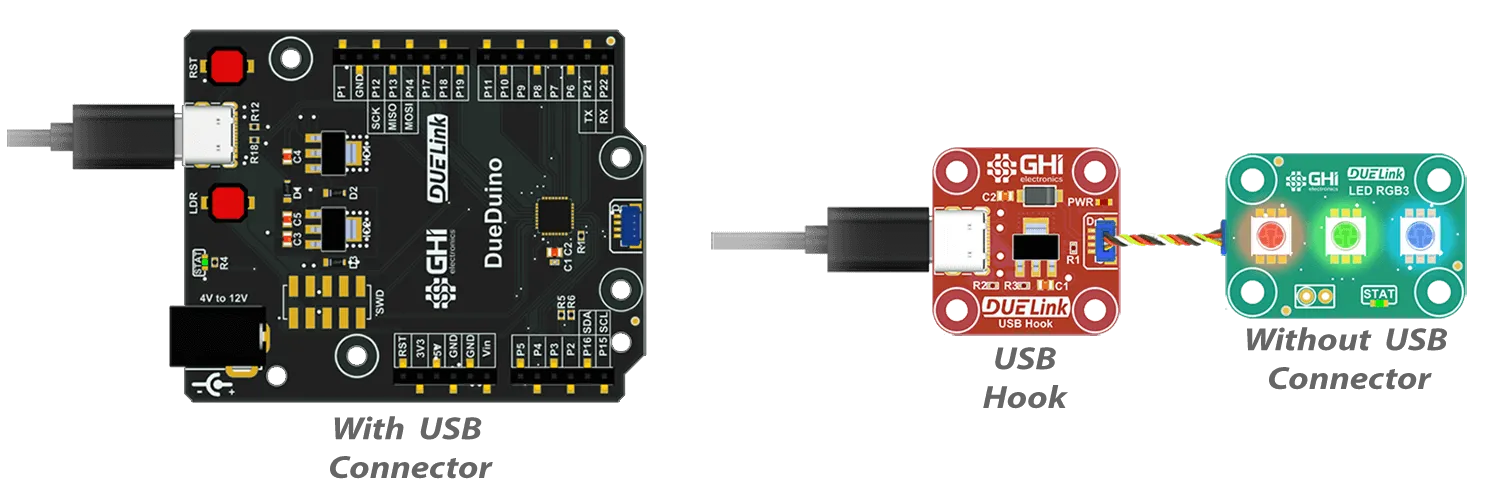
Plug your DUELink module into USB. Some modules have a built-in USB connector; the rest connect through a small adapter like USB Hook. Every module supports USB once connected.
Visit demo.duelink.com and type StatLed(200,200,5) to blink STAT LED 5 times. Commands that read a value — like a sensor — print (return) the answer. See your specific module's available commands on the Product Catalog.
Problems? You may need to install the latest firmware.
Use it from your code
The protocol is just text over USB, I2C, or UART — you can send commands yourself from any host. To make it easier, we ship official libraries for Python, JavaScript, .NET, Arduino, and MicroPython that handle the transport and parse the values modules return.
Every library exposes the same ExecuteCommand function that sends a command and returns the result. This function can be used to send the StatLed command for example.
duelink.Engine.ExecuteCommand("StatLed(200,200,5)")
Wrappers like duelink.System.StatLed() and other built in standard library function (commands) are provided for further simplicity. All these wrappers use ExecuteCommand() internally.
Pick your language and plug in your device to blink that STAT LED from code.
- Python
- JavaScript
- .NET
- Arduino
- MicroPython
Connect to a PC (click for image)
from DUELink.DUELinkController import DUELinkController

availablePort = DUELinkController.GetConnectionPort()
duelink = DUELinkController(availablePort)

# Blink the STAT LED (on 200ms, off 200ms, 5 times)
duelink.Engine.ExecuteCommand("StatLed(200,200,5)")
You need pip install DUELink. Full details are on the Python page.
Connect to a PC (click for image)
import pkg_serialusb from 'dlserialusb';
const {SerialUSB} = pkg_serialusb

import pkg_duelink from 'duelink';
const {DUELinkController} = pkg_duelink

let duelink = new DUELinkController(new SerialUSB());
await duelink.Connect();

// Blink the STAT LED (on 200ms, off 200ms, 5 times)
await duelink.Engine.ExecuteCommand("StatLed(200,200,5)");
You need npm install duelink and npm install dlserialusb. Full details are on the JavaScript page.
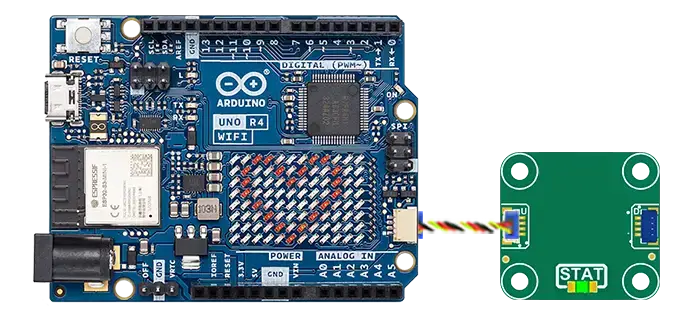
Connect to any Arduino with JST connector(click for image)
#include <DUELink.h>

TwoWireTransport transport(Wire1);
DUELink duelink(transport);

void setup() {
  duelink.Connect();
  // Blink the STAT LED (on 200ms, off 200ms, 5 times)
  duelink.Engine.ExecuteCommand("StatLed(200,200,5)");
}

void loop(){
}
You need DUELink and STM32 MCU based boards packages. Full details are on the Arduino page.
Connect to a PC (click for image)
using GHIElectronics.DUELink;

var availablePort = DUELinkController.GetConnectionPort();
var duelink = new DUELinkController(availablePort);

// Blink the STAT LED (on 200ms, off 200ms, 5 times)
duelink.Engine.ExecuteCommand("StatLed(200,200,5)");
You need the GHIElectronics.DUELink library from nuget.org. Full details are on the .NET page.
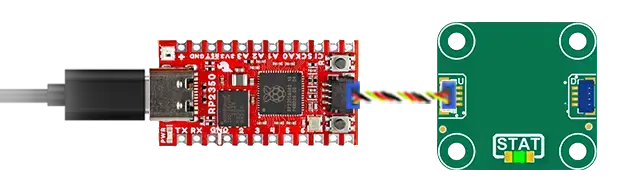
Connect to any RPI RP2350 or RP2040 board (click for image)
import time
import machine
import duelink

from duelink import transport
from machine import Pin, Timer

sclPIN = machine.Pin(23)
sdaPIN = machine.Pin(22)

i2c = transport.I2CTransportController(sda=sdaPIN, scl=sclPIN)
due = duelink.DUELinkController(i2c)

# Blink the STAT LED (on 200ms, off 200ms, 5 times)
due.Engine.ExecuteCommand("StatLed(200,200,5)")
You need to install duelink-stdlib-mp. Full details are on the MicroPython page.
How it works
Every DUELink module runs its own tiny firmware that listens for plain ASCII text over USB, I2C, or UART. When the module recognizes a command, it runs it. When the command returns a value — like a sensor reading — the module sends the answer back as text, terminated with a carriage return.
So confirming a connection literally looks like this on the line:
> StatLed(200,200,5)
>
A command that returns a value — for example, a distance module might answer 12.4 after you send its read command — prints the answer before the prompt comes back. Those commands are different on every module; see that module's Commands tab in the catalog.
That's the entire protocol. No register maps, no SPI dance, no datasheet drill-down. The command names are the same whatever host language you write in and whatever interface you connect over — USB, I2C, or UART.
StatLed(on, off, count) is the one of the standard commands found on every module. Then module-specific commands cover the unique needs of each module — a display module has Line(...) and Circle(...) for example.
What's connected?
Not sure which module you have plugged in? loader.duelink.com/discover queries everything on the bus and tells you what it finds. USB-connect your module(s) to a PC (use an adapter like USB Hook if the board has no USB connector), then click Discover.
Click View Product Details on any discovered item to jump straight to its catalog page — including its command list.
If Discover complains about a MicroBlocks firmware, load the DUELink Official firmware first.
Try something else

Whether you're prototyping commercial hardware, building a personal project, or teaching a classroom, DUELink has something for you — see What is DUELink? for the big picture, or jump straight to the Educators page for classroom-specific guidance.
Stuck? Ask on the DUELink forum.