Wireless
The Wireless ESP32 module to be configured to work in different modes, including wireless interface bridge.

The Wireless ESP32 module driver script allows it to work in three different modes.
- Interface Bridge
- Data Gateway
- AT Commands
To set the desired mode, Wireless ESP32 needs to be loaded with a small script. Similar to other modules, connect the module to a PC using a USB adapter, such as Power Hook USB Host.

Now, make sure the latest firmware and driver script are installed. If not sure, update using loader.duelink.com. Then open console.duelink.com and click the Connect button then copy/paste the provided script. Click the Record button then click the Run button.
Interface Bridge
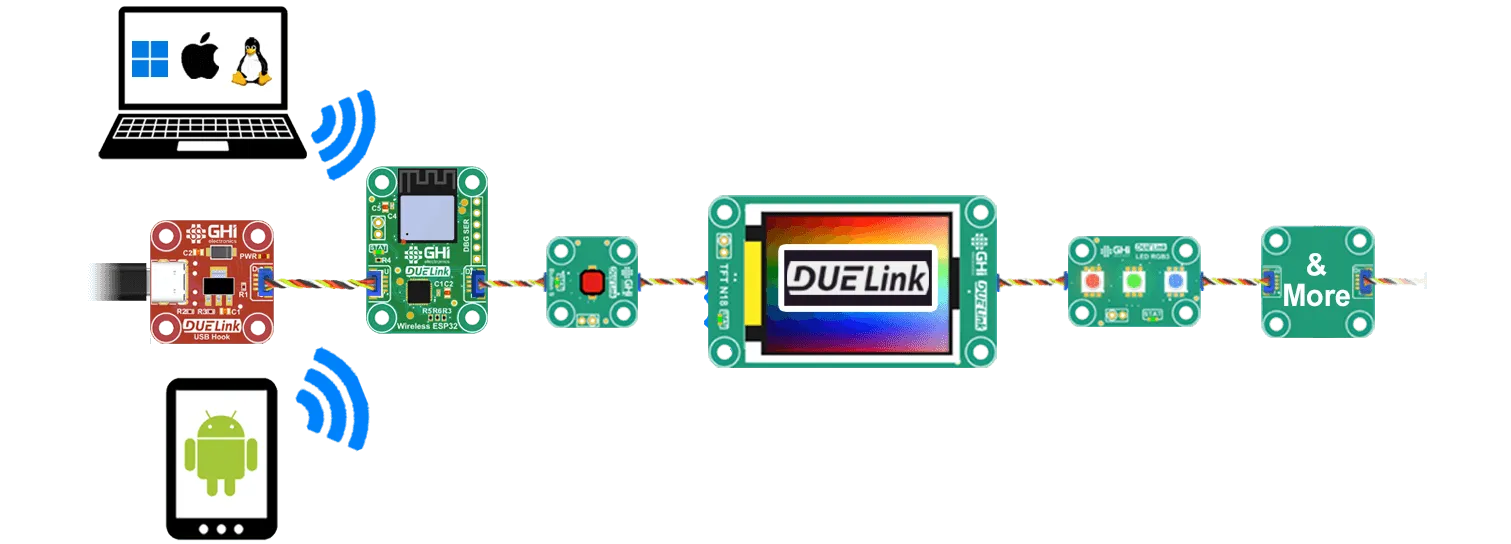
Cut the wire and use any Daisylink of DUELink modules wirelessly! Either WiFi or Bluetooth can be used to Daisylink modules wirelessly.
In case of Bluetooth, a virtual serial port is made available (SPP profile). Commands can then be carried out wirelessly using this virtual serial port, just like if commands were sent over UART or USB. Available Language libraries, such as Python, simply work with this virtual serial connection.
This single line starts Bluetooth in bridge mode.
StartBT("DUELink_BT", 0, 1) # name, AT mode, enable bridge

# StartBT() does not return in bridge mode!
The module will indefinitely wait for a Bluetooth connection.
In the case of WiFi, we need a slightly different script.
StartWiFi("MySSID", "MyPassword", "DUELink", 0, 1, 1000) # en, SSID, PWD, DNS, AT mode, bridge, timeout ms

#StartWiFi() does not return, unless failed to connect to WiFi.

Println("Failed to connect to WiFi")
StatLed(0,0,1) # LED off
WiFi starts a TCP server that is listens to port 8080. The easiest way to try this server is using a terminal software, such as TeraTerm. Open TeraTerm and select TCP/IP then enter DUELink for the Host name. Select Other from the Service options. Set TCP Port# to 8080. Once the connections is established, you can type in commands manually to control modules. Go ahead and enter statled(200,200,10) and hit enter to see the STAT LED blinking 10 times on the device 1 module.
Echo() does not work properly as TeraTerm (and most terminals) will only send data when you hit enter when used in TCP mode. You can enable local echo to see what you type!
Note that provided libraries only work with serial ports, making them compatible with Bluetooth's virtual serial ports. These libraries do not work with WiFi as is.
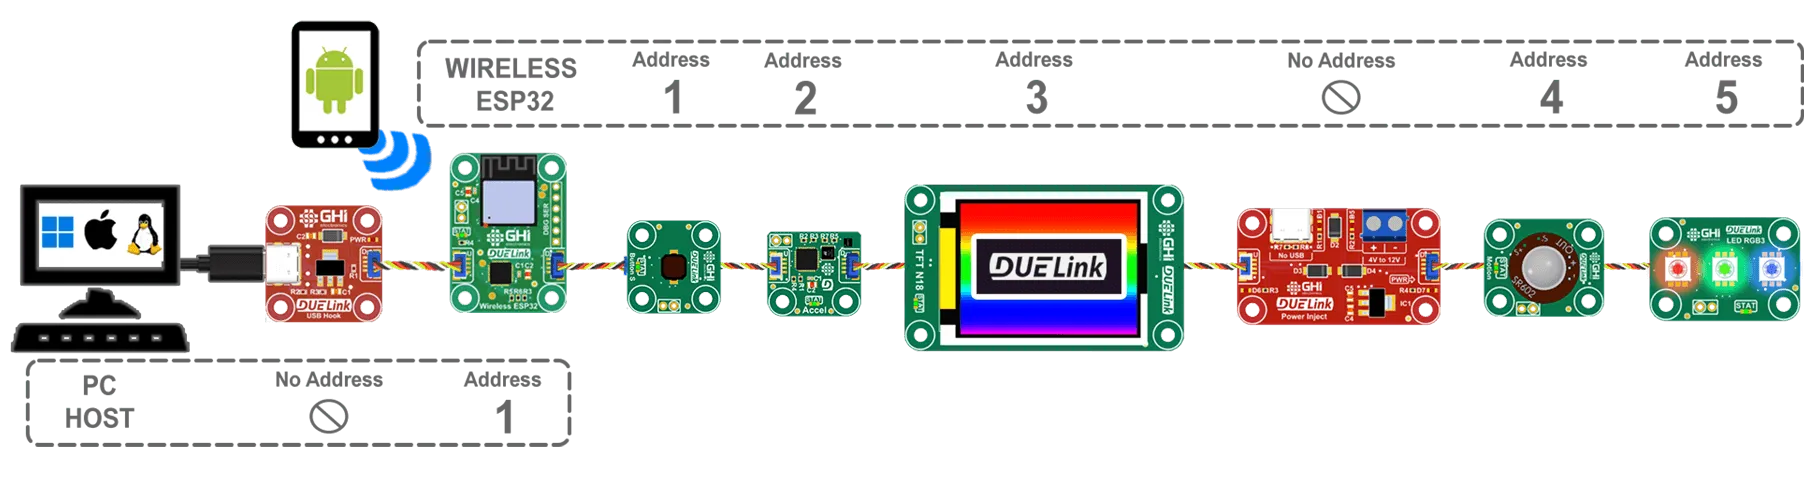
It is important to remember that the Wireless ESP32 module acts as wireless-to-Daisylink "Interface Bridge" and is not part of the chain. This is accomplished using Host Mode explained on the Daisylink page. To USB, Wireless ESP32 is device address 1 but the other modules are "bridged" to the wireless chain and are no longer accessible from USB, as they are now accessible from the wireless bridge. The first module is address 1 to the wireless connection, and is not accessible by USB.
Data Gateway
This mode handles everything internally to give you a way to read and write bytes, using Bluetooth or WiFi. You will be using WlReadCnt(), WlRead() and WlWrite() to read and write bytes from the wireless connection. Note that these functions can't be used directly in the same script. Instead, they can be accessed from a tethered device. For example, an Arduino or a micro:bit can send a byte wirelessly using WlWrite(). You can even tether another DUELink module and use it to send these commands.

As always, Bluetooth starts a virtual serial port.
StartBT("DUELink_BT", 0, 0) # name, no AT mode, no bridge

# StartBT() does not return in gateway mode!
Using WiFi is almost identical. This starts a TCP server listening to port 8080.
StartWiFi("MySSID", "MyPassword", "DUELink", 0, 0, 30000) # SSID, PWD, DNS, no AT mode, no bridge, timeout ms
# StartWiFi() will only return if WiFi connection failed

Println("Failed to connect to WiFi")
StatLed(0,1,0) # LED off
# WlRead() and WlWrite() can't be used here. Only from a tethered device.
You can now use a tethered device to send WlRead() to read data from WiFi, where -1 means no data. The WlReadCnt() returns the count of bytes ready for you to read. Use WlWrite('B') to send a byte over WiFi, 'B' in this example.
incoming = duelink.Engine.ExecuteCommand("WlRead()");// read a byte from the wireless connection
If using another DUELink module, then we can also send commands using Host Mode. For example, we can give DueSTEM a wireless connection.
DLMode(2,0) # Switch Downlink to host mode
Wait(100) # This delay is more than enough for 50x modules.
cmd("sel(1)")

_b = cmd("WlRead()")
AT Commands
This mode gives you direct access to the Espressif AT Commands, with full control over the wireless functionality. This is a flexible option but you need to know how to use the available Espressif AT Commands.
This partial code shows some of the code needed to read the weather forecast.
s = StartWiFi("MySSID", "MyPassword", [], 1, 0, 30000) # SSID, PWD, DNS (empty), AT mode, no bridge, timeout ms
if s < 0
Println("Failed to connect to WiFi")
StatLed(0,1,0) # LED off means timed out!
while 1
wend
end
# Enable multiple TCP/UDP connections
AtCmd("AT+CIPMUX=1")
# Wait for OK
ATWaitResp(1000)
# Use connection 0
AtCmd("AT+CIPSTART=0,\"TCP\",\"api.open-meteo.com\",80")
# Wait for OK # up to 4seconds, depend on the TCP connection
ATWaitResp(4000)
# This string to request weather
dim b1[] = "GET /v1/forecast?latitude=42.1&longitude=-83.3¤t_weather=true HTTP/1.1\r\nHost: api.open-meteo.com\r\n\r\n"
# Calculate size of the string, assign to b2
dim b2[50]
SprintF(b2,"AT+CIPSEND=0,%d",len(b1))
# Let ESP know this size will come
AtCmd(b2)
ATWaitResp(1000)
#...
#... read response ...
#...
Bluetooth works similarly.
StartBT("DUELink_BT", 1, 0) # name, AT mode, no bridge

# Continue with bluetooth AT commands.
AtCmd("....")
STAT LED
The provided Wireless ESP32 driver script takes control over STAT LED to help you in determining the connection status.
- LED is on for 50ms one a second: Waiting for connection to bluetooth or WiFi.
- LED is toggled once every second: WiFi or Bluetooth is connected.
- LED is toggled once every 250ms: TCP connection is established.
Status Pins
There are 2 internal pins on the Wireless ESP32 module that are used to determine the current connection status.
- Pin 5: WiFi or Bluetooth is connected when pin 5 is low.
- Pin 4: TCP connection is established when pin 4 is low.
For example, use DRead(5,1) to determine if the you have a connected wireless connection.
ESP32 firmware
The firmware we preload on the ESP32 module is a special build that slightly changes Espressif default to add flow-control pins, fix to 9600 baud, and add Classic Bluetooth SPP profile. The changes are found on GitHub if you are curious!
Updating the ESP32 firmware is automated via our internal DUELink Programmer tool. Do not confuse the DUELink micro's firmware with the ESP32 firmware.
Custom Scripts
Thanks to DUELink Scripts, the Wireless ESP32 can be loaded with custom scripts to handle specific task, like read the forecast to provide today's highTemp() for example. Any hardware can now easily read today's high temp: duelink.Engine.ExecuteCommand("HighTemp()").
Since JSON is an essential part of the internet, we have implemented a basic JSON parsing for you.
Here is a complete project with a script that provides HighTemp() plus multi-language samples on how to use it. Start by loading "hightemp-script" onto Wireless ESP32 module and then use any of the samples with a Supported Hardware to access HighTemp().