DueSTEM Tutorial
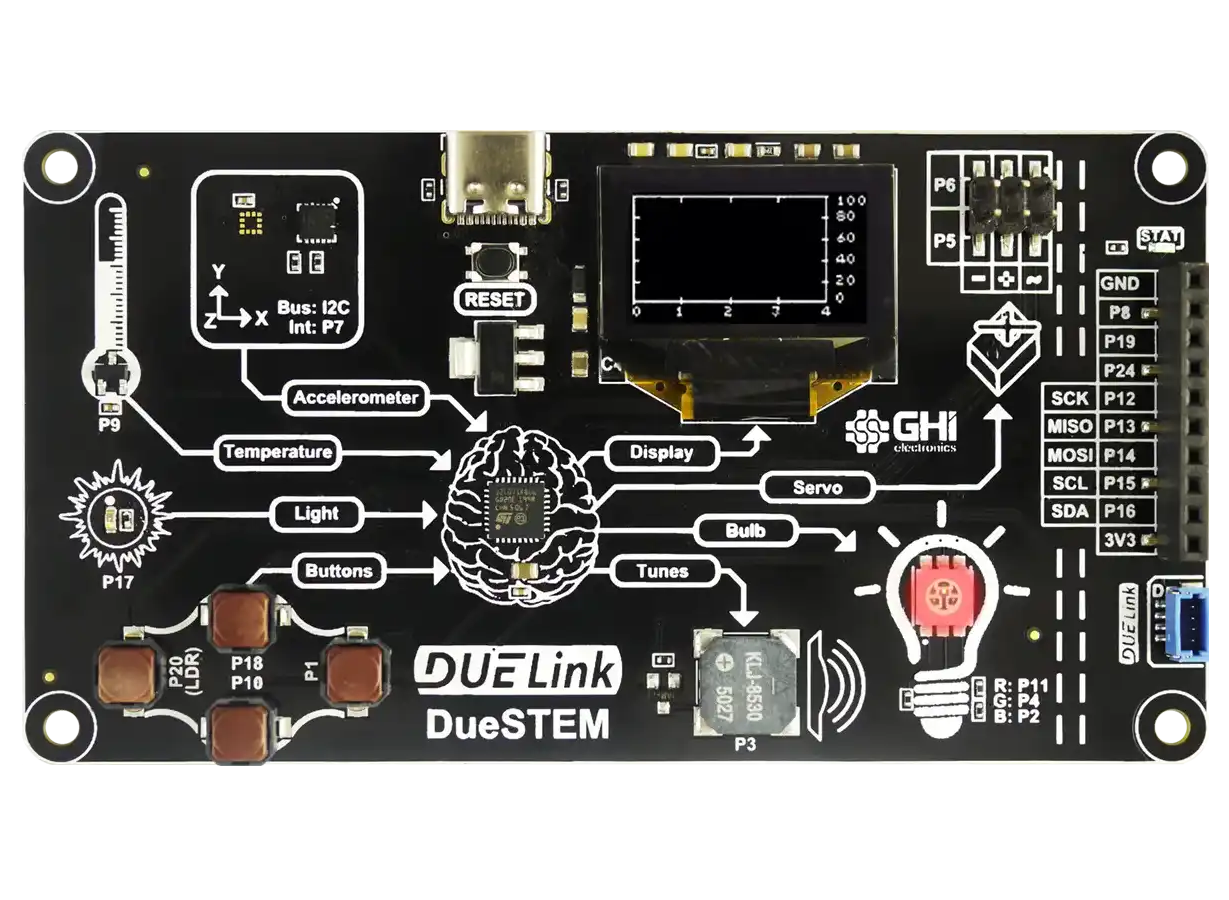
DueSTEM's Input → Process → Output mindset shines among Educators. You will quickly see how systems take inputs, process that input, to then take action on the outputs.
While there are several coding options for DueSTEM, we will focus on MicroBlocks block-coding and on Python. Using other high-level languages, like JavaScript and .NET C#, is similar to Python.
| Compare | MicroBlocks | Python |
|---|---|---|
| Difficulty | Very Easy | Medium to Advanced |
| Style | Drag-and-Drop blocks | Type coding |
| PC use | Only to code but runs standalone | PC is needed to execute |
| Libraries | MicroBlocks libs | DUELink standard libs |
| Popularity | Mostly Schools | Global Use |
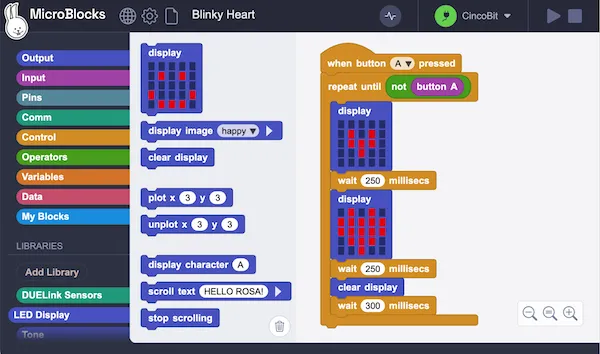
MicroBlocks
Why should you use MicroBlocks:
- Easy to start.
- Easy to learn.
- Runs right on the hardware. Programs continue to run even if the computer was disconnected.
- Any changes on the designer surface show immediately on the device.
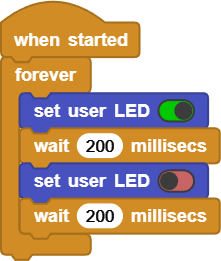
Before we get started, visit the Getting Started page to blink the STAT LED.
The MicroBlocks' page has full details if necessary.
Libraries
When MicroBlocks detects DueSTEM, an Edu focused-board, it automatically adds the DUELink Edu library. You can add it manually as well. It will also add the Tiny OLED library to help with display, plus Tone for making sounds.
Input
There are four inputs. All inputs are directly supported by the DUELink Edu lib.
| Function | DUELink Edu block | Notes |
|---|---|---|
| Accelerometer | DueSTEM tilt | Pick x,y,z to read acceleration in one of the axis. |
| Temperature | DueSTEM Temperature (x10) | Read temperature in celsius, multiplied by 10, 245 is 24.5 degrees. |
| Light | due light level (0-1000) | Read the ambient light intensity in the range of 0 to 1000, where 0 is very dark and 1000 is super bright. |
| Buttons | DueSTEM [left] button | Returns the press status of one of the four buttons. |
Process
This is where the "brain" needs to make some decisions. You will be using a lot of blocks from under the Control palette, such as if. This conditional block will also need some of the Operators blocks.
Output
The four outputs are also supported by libraries. The multicolor lightbulb is controlled by the DueSTEM bulb block. It uses the three primary RGB colors to make up any desired color.
Samples
These samples show some DueSTEM uses.
| 📽 Video | Project Link | Functionality |
|---|---|---|
 | Default Project Demo | This is the default demo. Use buttons to move the spaceship left and right and up to shoot. Light and temperature show on the display. Use down to move a servo. |
 | Feed Me! | This demo uses the on-board accelerometer. You have 10 seconds to eat as many fruits as you can! |
 | Hearing Test | How good is your hearing? Hold the right button and see how far you can go. |
 | Color Selector | What is your favorite color? Use the left button to pick one of the three primary colors (Red/Green/Blue) then use up and down to change the levels. |
Daisylink
DueSTEM also includes a Downlink connector for Daisylinking other modules. A special library, called DUELink Daisylink is used to send commands to connected modules. The product pages of these connected modules include a Driver tab that shows what commands (functions) are provided by that individual module.
In this example, we will control Snowy, a smart snowflake!
The Snowy module, or any other Daisylinked module, must be loaded with the official DUELink firmware. The MicroBlocks' firmware is only loaded on DueSTEM.
Load the Snowy Daisylink project to see how it works.
Python
DueSTEM's inputs and outputs are a great showcase of how Python can access the physical world.
Before we get started, visit the Getting Started page to learn how to blink the STAT LED using Python.
By now, you should know how to start the DUELink controller in Python to control hardware, duelink = DUELinkController(availablePort).
You now have 2 options to control DueSTEM's elements. You could use the provided Driver Script, which is the easier approach. There is a tab on DueSTEM Product page for the Driver API. For examples, there is Light() driver function that returns the light level.
That function can then be wrapped in Python.
def GetLight():
    ret = int(duelink.Engine.ExecuteCommand("Light()"))
    return ret

light = GetLight()
But wait, we have already made these wrappers! The Tethered Sample for Python tab on DueSTEM Product page has all wrappers and a loop to get you started. Here it is to help you out:
PC Tethered Python Sample (click for code!)
loading...
The second option for controlling elements is by accessing the pins directly using the standard library. This option requires more understanding of the hardware but gives you further control. To start, you can use the Driver code and the schematics to help you in understanding what libraries or pins/functions are being used.
Let's use for example use Sweep() instead of Beep() to make laser sounds! From the driver's "beep" function, we can see that it uses pin 3 to play sounds.
# An example function from the driver script
fn Tunes(f,d)
    Beep(3, f, d)
fend
The python program can now use pin 3 to make the laser sound! We do so by sweeping frequency from 8Khz to 4Khz with, volume going from 200 to 20, over 200ms. Now, repeat that 3 times and we have a sound effect!
def Laser():
    duelink.Sound.Sweep(3,8000,4000,200,20,200)
    duelink.Sound.Sweep(3,8000,4000,200,20,200)
    duelink.Sound.Sweep(3,8000,4000,200,20,200)

Laser()
From here, you can extend any Python project with a physical-element reach. Visit the Projects page and filter Python for some ideas. Maybe you want to set the light bulb green when your favorite stock goes up. Or, perhaps make some sounds and show a message on the display a build fails!
This page is about DueSTEM but don't forget that each product page includes a Python demo as well.