Firmware updates
If a module isn't responding to commands, or Discover shows it with the wrong firmware, update it from the online loader.
Visit loader.duelink.com and pick which firmware to load:
- DUELink Official — the standard text-command firmware. This is what every other page in these docs assumes you have. Pick this unless you specifically need MicroBlocks.
- DUELink MicroBlocks — the classroom block-coding firmware. Pick this if you're using the MicroBlocks workflow.
It is a 2 step process, starting with "Erase All" to clear out the module and then loading it with new firmware (and sometimes drivers).
The online loader only works with Chrome or Edge browsers. The operating system doesn't matter.
Troubleshooting
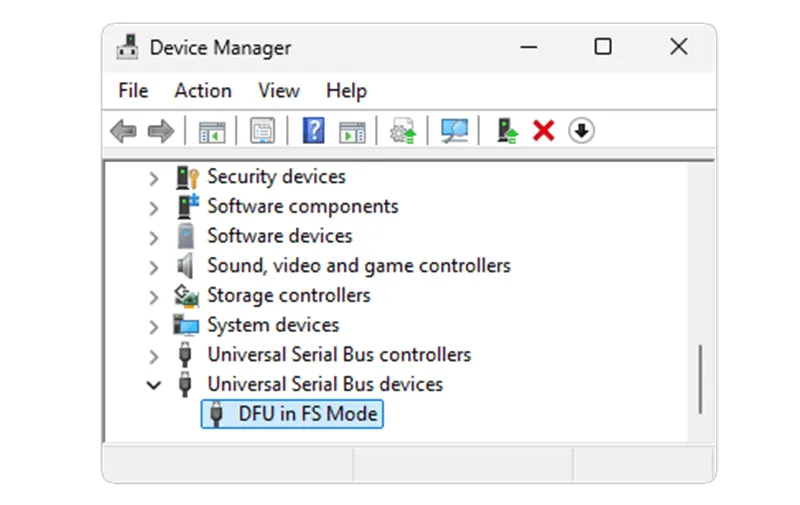
Check Device Manager first (Windows)
Before working through the steps below, open Device Manager on Windows to see how your PC currently sees the module. The result tells you which step to try next:
- Running firmware — appears as a
COMport under Ports (COM & LPT). The module is healthy; if the loader still can't talk to it, try Erase All (step 1 below). - In DFU mode — appears as
DFU in FS Modeunder Universal Serial Bus controllers. The module is waiting for firmware; skip straight to loading (step 2 below). - Yellow warning icon next to
DFU in FS Mode— the module is in DFU mode but the USB driver isn't installed. Install drivers from the Drivers section. - Nothing at all — the module isn't being recognized. Try a different USB cable or port; if it still doesn't appear, force DFU mode manually (step 3 below).
Update sequence
If the loader can't update your module, work through this sequence:
- Click "Erase All". This puts the module in DFU (Device Firmware Update) mode and lets the loader push the new firmware.
- If "Erase All" did not show a device to connect, just try loading the firmware. Your device might already be erased and in DFU mode — go straight to loading. Note: Once a module is erased, it can't be erased again until firmware is reloaded.
- If both fail, force DFU mode manually (Force DFU Mode below).
- Windows users: if the module enters DFU mode but the loader can't talk to it, install the DFU USB drivers (Drivers section).
Force DFU Mode
You can manually force a module into DFU mode by pulling the LDR pin high while the module powers up or resets.
For power users: LDR is our name for STM32's BOOT0 pin.
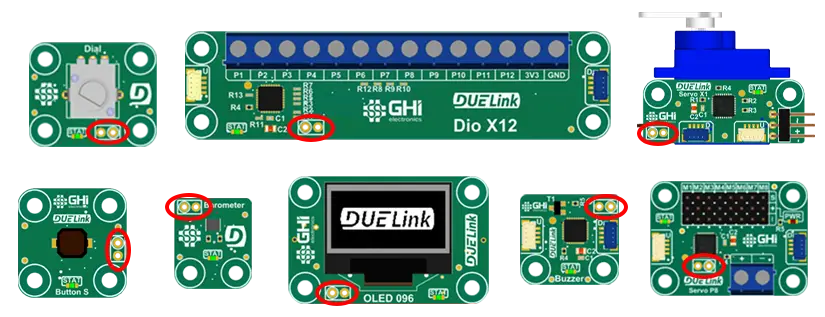
With an LDR or A button
Many modules have a button labeled LDR or A that pulls the LDR pin high when pressed.

- Press and hold the
LDR(orA) button. - While still holding it, click the reset button — or, if there's no reset button, unplug and re-plug the USB cable.
- Release the
LDRbutton.
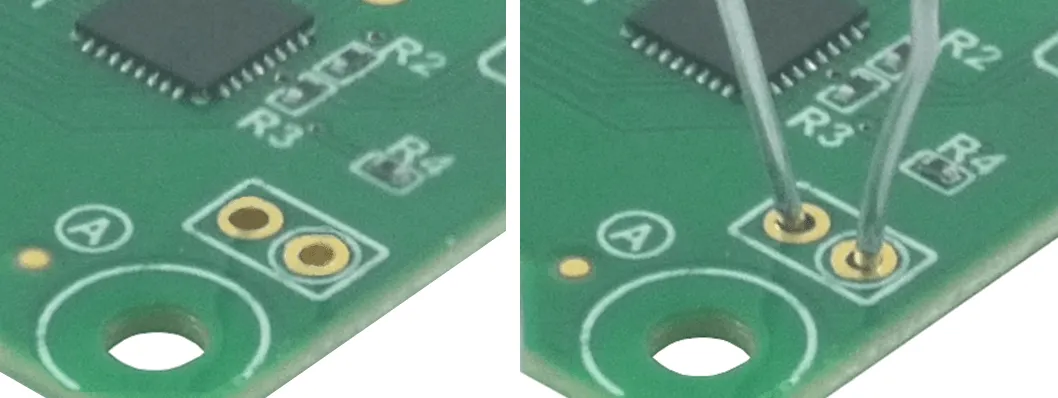
Without a button: use the LDR pads
Modules without a button have two LDR pads instead.
Bend a small metal paper clip (or a piece of wire) across the two LDR pads, then reset or re-power the module. Remove the paper clip once the board is powered up.
After forcing DFU mode
The module will appear as a DFU device in Device Manager. If this is the first time on this PC, confirm the USB driver is installed (see Drivers).
Forcing DFU mode does not erase or modify the module's contents until new firmware is sent.
You can now return to loader.duelink.com, skip "Erase All", and load the firmware.
Cloning a chain
Once one module in a chain is updated, the loader can clone its firmware to every other module on the Daisylink automatically. This is the easiest way to update modules that don't have a USB connector — update one module that does, then let it copy itself down the chain.
Updating a chain when MicroBlocks is in use: start as if MicroBlocks isn't in use — load every module with DUELink Official firmware first, then reload MicroBlocks on the first module.
For the full mechanism and scripting examples, see Cloning.
DFU USB Drivers
DFU is a standard USB class supported by all major operating systems.
Windows supports DFU but doesn't always install the drivers automatically and may not prompt you to. If you're not sure, install the USB drivers from the downloads page.
With drivers properly installed, Device Manager will show DFU in FS Mode with no errors.
Done updating? → Get Started